A practical class-result workflow
I Have Marks of 40 Students in Excel. How Can I Create a Separate Report Card PDF for Each Student?
You already have the part that requires academic work: the marks for all 40 students are in Excel. Yes, you can use one prepared class sheet and one reusable report-card template to create a separate PDF for each student. Put one student on each row, keep the headings consistent, and place matching variables in the template. One row then supplies the name, roll number, subject marks, grade and remark for one personalised file.
The important boundary is that document generation does not calculate or approve the results. Check the marks, totals, percentages, grades and remarks first. Then preview varied students, choose a useful filename pattern, generate the class batch and review it before anyone receives a report card.
This avoids the risky alternative: duplicating one student’s document 39 times and replacing fields by hand. In that process, an old name, mark or remark can easily remain in the next file.
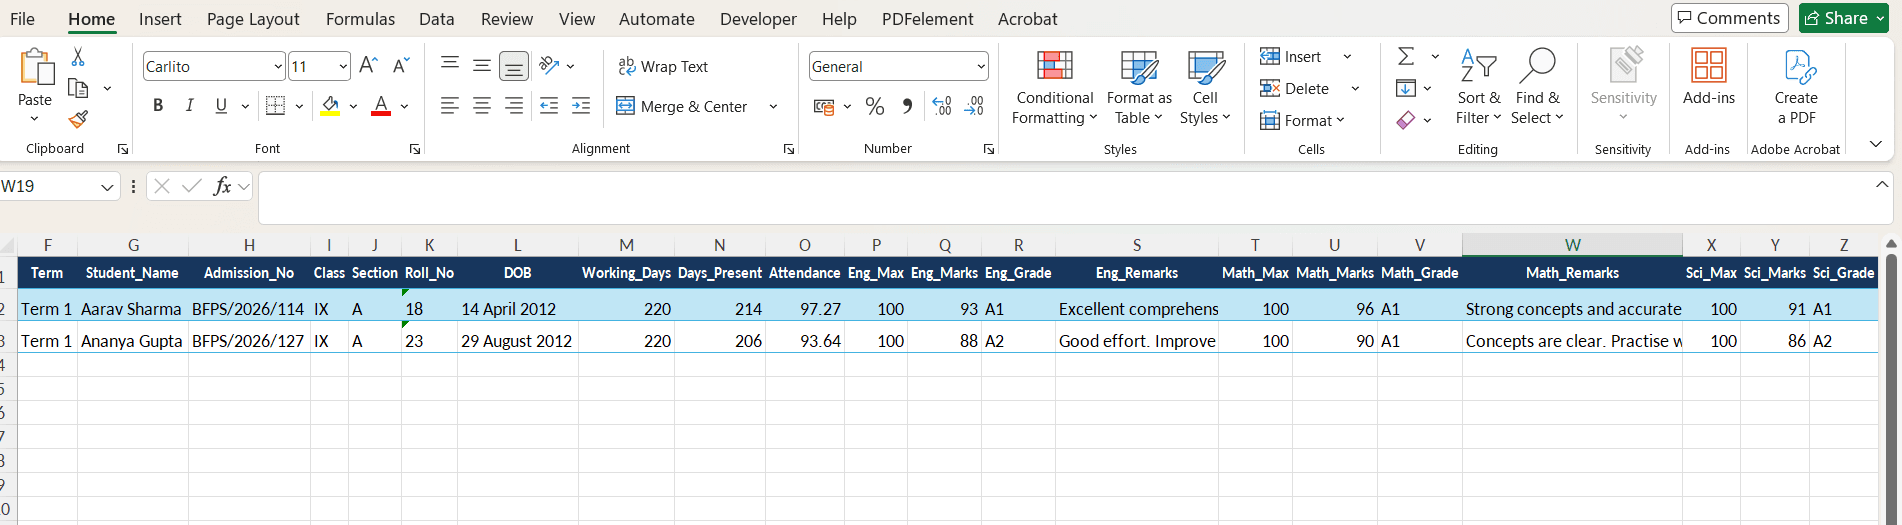
What should my Excel file look like?
Start with a single header row and one row for each student. Avoid decorative headings, merged cells and notes above the table in the upload sheet. They may be useful in a working workbook, but the final generation file should make the column names and student rows unambiguous.
The headings do not have to match the examples below. A school may use Admission_Number instead of Roll_Number, Maths instead of Mathematics, or Result_Status instead of Grade. What matters is that the chosen heading is used consistently and has a matching variable in the report-card template.
| Possible column | What the value means |
|---|---|
| Student_Name | The verified name that should appear on the report card. |
| Roll_Number | A stable class identifier that can also help name the PDF. |
| Class | The approved class label, such as IX or Grade 9. |
| Section | The section or division, when the school uses one. |
| English | The final English mark in the school’s approved display format. |
| Mathematics | The final Mathematics mark. |
| Science | The final Science mark. |
| Social_Science | The final Social Science mark, if it belongs on the card. |
| Total | A total already calculated and checked by the school. |
| Percentage | A percentage already calculated according to school policy. |
| Grade | The approved grade; it is not assigned during PDF generation. |
| Teacher_Remark | The final teacher-written and approved remark. |
These columns are examples, not compulsory fields. Include only the information approved for your report-card format.
How does one row become one personalised PDF?
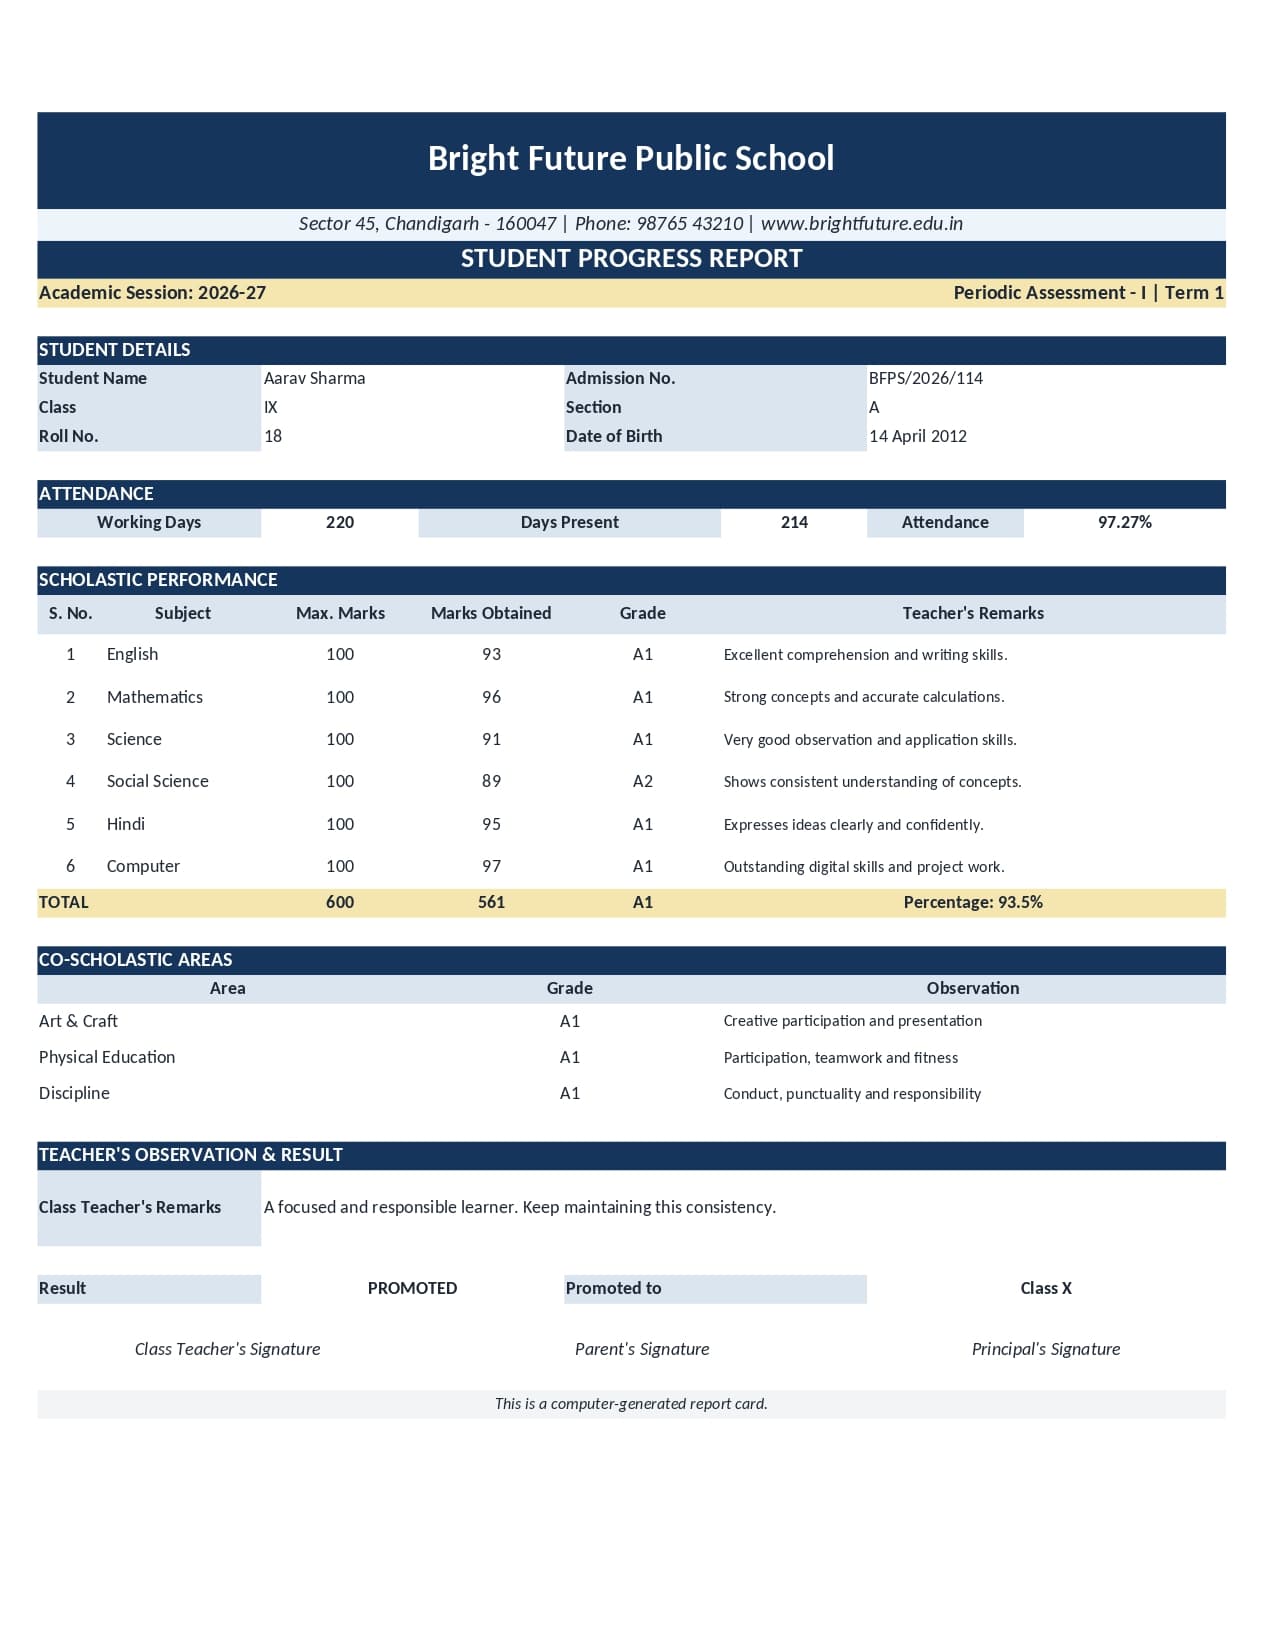
A template variable is a placeholder for a spreadsheet column. If the Excel heading is Student_Name, the matching template field can be {{Student_Name}}. The same idea applies to {{Roll_Number}},{{Mathematics}} and{{Teacher_Remark}}.
When a row is processed, its Student_Name value replaces the Student_Name variable, its Mathematics value replaces the Mathematics variable, and so on. The fixed school name, subject labels, borders, signatures and instructions remain unchanged. The next row supplies the next student’s values for a new PDF.
This is a placement process, not an academic calculation. If the spreadsheet says 86.4 under Percentage, the document can show 86.4. DataToPDF does not decide whether that number is correct or whether it corresponds to a particular grade.
What should I review before generation?
Work across the row, not just down the subject columns. A student can have perfectly entered marks but the wrong roll number or a remark copied from another learner. Before upload, an authorised member of staff should check at least the following:
- Student names against the approved register
- Roll or admission numbers for duplicates
- Every subject mark and maximum-mark scale
- Totals and percentages calculated under school policy
- Grades, results and promotion status
- Attendance values when included
- Teacher remarks and other comments
- School, class, section, term and examination details
Keep a final approved copy of the spreadsheet. If a correction is required later, change the source record through the school’s normal review process and generate a controlled replacement. Do not edit a final PDF and leave the source data unchanged.
How should I name 40 student PDFs?
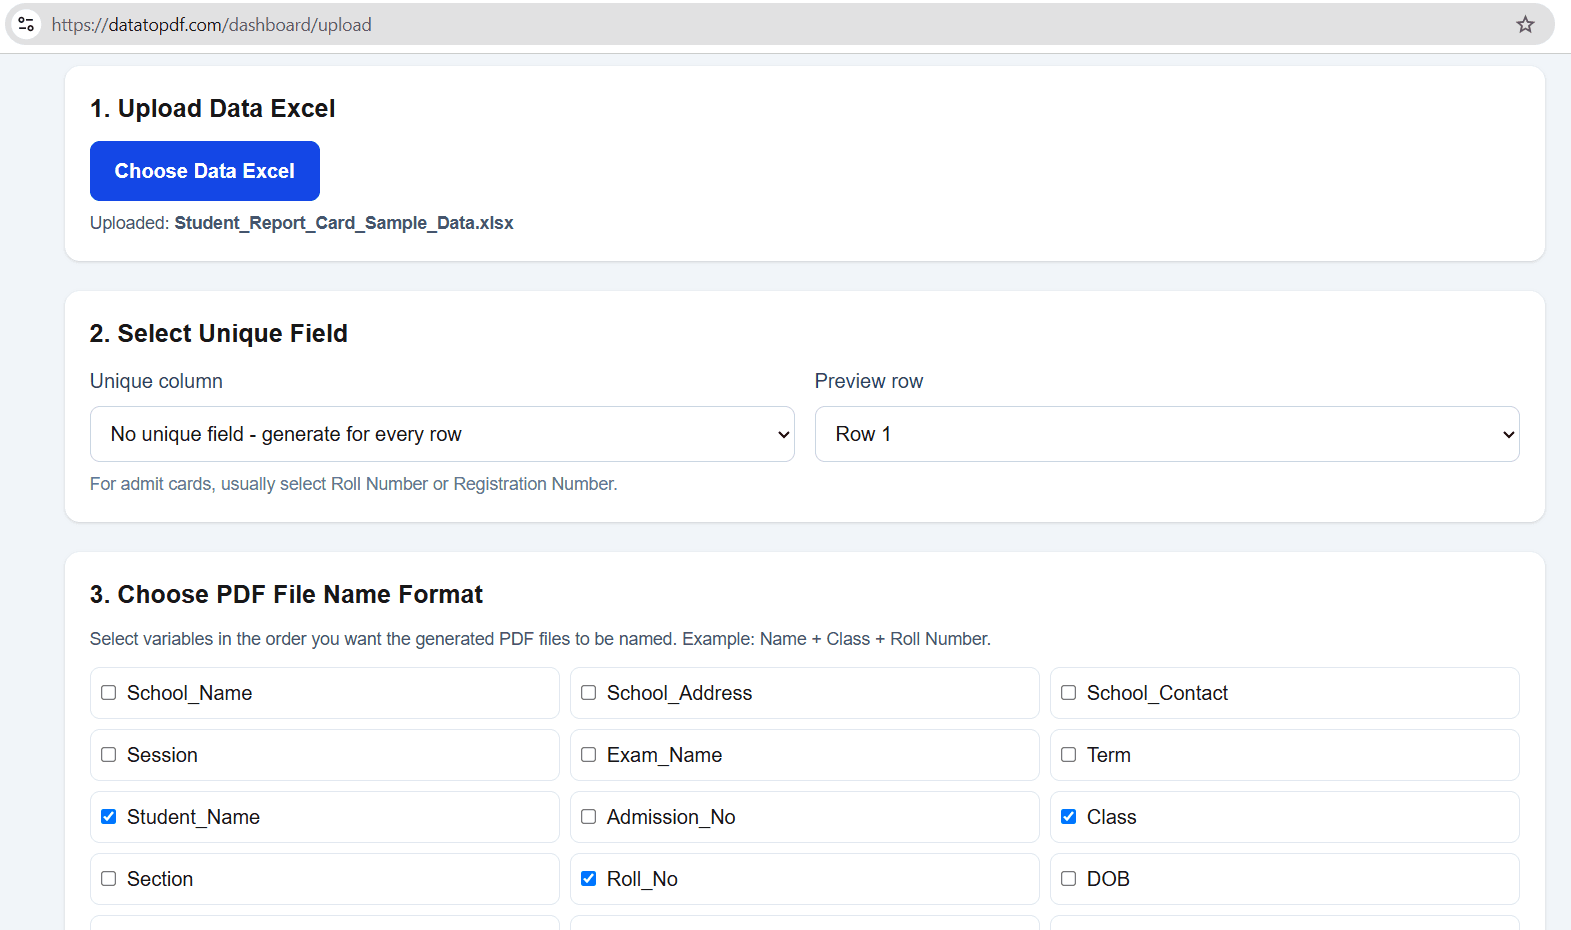
The filename should help authorised staff identify a document without opening every file. Student_Name may be readable, but two students can share the same name. Roll_Number may be unique within one class but repeat in another. Combining stable fields is often clearer: for example, Student_Name + Class + Roll_Number.
Use only information that is appropriate to expose in a filename. Avoid sensitive details simply because they are available in the spreadsheet. After choosing the pattern, scan the generated names for duplicates, awkward punctuation, missing identifiers and values that could cause the wrong file to be selected.
What happens if a mark or remark is blank?
A blank cell is not a decision. It could mean absent, not applicable, not yet entered or accidentally omitted. Document generation cannot know which meaning the school intended. Resolve the case before upload and enter the approved display value, such as Absent or N/A, if that is what the school’s policy requires.
Blank remarks need the same attention. If a remark is optional, test how the empty field looks in the template. If it is required, return the row to the responsible teacher. Never ask the PDF step to invent a comment or infer performance from the marks.
Different students can have different approved remarks. Store each one on the correct student row, then check several generated files to make sure the remark has stayed with the right learner.
A sensible workflow for a class of 40
1.Freeze the approved marks sheet
Finish calculation, moderation, grade assignment and teacher remarks before document work begins.
2.Make the rows consistent
Confirm there are 40 intended student rows, one header row and no accidental duplicate records.
3.Match template variables
Check that every changing field in the template uses the exact corresponding Excel heading.
4.Preview contrasting students
Test a long name, a short name, blank-approved values, longer remarks and different grade or result statuses.
5.Choose and test filenames
Use appropriate student identifiers and make sure every expected output name will be unique.
6.Generate and reconcile
Create the PDFs, confirm the output count against the approved rows and investigate any discrepancy.
7.Review before distribution
Inspect student identity and academic fields across the batch, then use the school’s normal secure distribution process.
Who is responsible for the final report cards?
DataToPDF takes user-prepared Excel or CSV data and a reusable Word or Excel template, then generates personalised PDFs. It does not calculate marks or percentages, assign grades, decide pass or fail, evaluate students, write teacher remarks, verify school records or maintain academic history.
The school remains responsible for student names, roll numbers, marks, totals, percentages, grades, remarks, attendance, promotion status, teacher comments, school details and every other academic value. It must also check the generated files and control how they are distributed.
If you need the broader product workflow, review theReport Card Generator from Excel. If your main question is preserving a school’s existing design, read how tofill a Word report-card format for an entire class.
Frequently asked questions
Does each student need a separate Excel file?
No. Keep the class in one structured Excel or CSV file with one student per row. Each row can then supply the values for one personalised PDF.
Will DataToPDF calculate totals, percentages or grades?
No. The school must calculate and verify marks, totals, percentages, grades, results and other academic values before uploading the data.
What happens if a student has a blank mark?
The blank remains source data; it is not interpreted automatically. Decide whether the correct value should be blank, Absent, Not Applicable or something else, enter the approved display value, and preview it before generation.
Can the PDF filename contain a student name and roll number?
Yes. You can choose prepared fields such as Student_Name, Roll_Number, Class or Section for the filename. Use a combination that is unique and appropriate for your school records.
Can every student have a different teacher remark?
Yes. Put each approved remark in the Teacher_Remark cell on that student’s row and use the matching variable in the template. DataToPDF places the supplied text; it does not write or assess the remark.
Related resources for the next step
Start with five varied students, not all 40
Once the class sheet is final, use a few deliberately different rows to test the variables, layout and filename pattern. Generate the complete batch only after those previews have been checked.